Running the VFX for The Maze Runner
 Already a popular young adult series that has spawned a trilogy and a prequel, The Maze Runner
opens with a mystery: its central character awakens with no memory, in a
maze whose 100-foot walls keep rearranging themselves. The maze is also
populated by Grievers, slug-like creatures with six mechanical legs and
venomous scorpion tails. Unsure of why he is there, or how he can get
out, Thomas meets other young people caught in the maze, known as
Runners, and finds that even more mysteries are piling up far more
quickly than answers are arriving.
The Maze Runner opened with a gross of $81 million worldwide in
its first three days, with some of the highest critical acclaim and
audience scores this side of The Hunger Games.
While YA dystopias are just now showing up in significant numbers
onscreen, the literary genre has been incredibly vibrant for
generations. The current wave was certainly energized in 2005 by the
publication of the novel The Hunger Games, but the genre's
roots go back another 50 years beyond that. As one of the most popular
genres of young adult literature – even moreso than vampires in love or
wizards – it's only reasonable for Hollywood to tap into sources that
stretch a bit deeper and wider than comics, reboots and resurrected TV
series. Films based on books! Imagine that.
Some of the strength of The Maze Runner's opening is in fact
due to the intensity of its readers' enthusiasm, as it has spawned a
popular trilogy, and most recently, a prequel. One of those fans is the
daughter of Method VFX's Sue Rowe, a supervisor whose films include X-Men: The Last Stand, The Golden Compass (which won a VFX Oscar), Die Another Day, and John Carter. [Sue spoke to us about her work on that one, in a terrific story here.]
In fact, Sue's daughter felt so strongly about it that Sue got swept up
in it, and very simply, campaigned 20th Century Fox for the job until
Method was awarded the contract as the exclusive VFX house for the film.
Already a popular young adult series that has spawned a trilogy and a prequel, The Maze Runner
opens with a mystery: its central character awakens with no memory, in a
maze whose 100-foot walls keep rearranging themselves. The maze is also
populated by Grievers, slug-like creatures with six mechanical legs and
venomous scorpion tails. Unsure of why he is there, or how he can get
out, Thomas meets other young people caught in the maze, known as
Runners, and finds that even more mysteries are piling up far more
quickly than answers are arriving.
The Maze Runner opened with a gross of $81 million worldwide in
its first three days, with some of the highest critical acclaim and
audience scores this side of The Hunger Games.
While YA dystopias are just now showing up in significant numbers
onscreen, the literary genre has been incredibly vibrant for
generations. The current wave was certainly energized in 2005 by the
publication of the novel The Hunger Games, but the genre's
roots go back another 50 years beyond that. As one of the most popular
genres of young adult literature – even moreso than vampires in love or
wizards – it's only reasonable for Hollywood to tap into sources that
stretch a bit deeper and wider than comics, reboots and resurrected TV
series. Films based on books! Imagine that.
Some of the strength of The Maze Runner's opening is in fact
due to the intensity of its readers' enthusiasm, as it has spawned a
popular trilogy, and most recently, a prequel. One of those fans is the
daughter of Method VFX's Sue Rowe, a supervisor whose films include X-Men: The Last Stand, The Golden Compass (which won a VFX Oscar), Die Another Day, and John Carter. [Sue spoke to us about her work on that one, in a terrific story here.]
In fact, Sue's daughter felt so strongly about it that Sue got swept up
in it, and very simply, campaigned 20th Century Fox for the job until
Method was awarded the contract as the exclusive VFX house for the film.
 Decayed, ivy-covered walls were at the heart of the "character" of the maze. Click on any image to view larger.
Method's team of 170 worked for 10 months to create 150 character shots
and 380 environment shots. Environments have been one of Method's long
suits, but character animation is new. To build the company's strength
in that area, they added Erik de Boer, Academy Award winner for his work with Rhythm & Hues on Life of Pi, and former WETA whiz James Jacobs, an Academy Sci-Tech Award winner for technology used for The Goblin King in The Hobbit: An Unexpected Journey.
Decayed, ivy-covered walls were at the heart of the "character" of the maze. Click on any image to view larger.
Method's team of 170 worked for 10 months to create 150 character shots
and 380 environment shots. Environments have been one of Method's long
suits, but character animation is new. To build the company's strength
in that area, they added Erik de Boer, Academy Award winner for his work with Rhythm & Hues on Life of Pi, and former WETA whiz James Jacobs, an Academy Sci-Tech Award winner for technology used for The Goblin King in The Hobbit: An Unexpected Journey.
The creatures they set themselves to work on were the Grievers, who
needed to be agile and threatening as they roamed the maze at night,
attacking anyone they came across.
 At the heart of The Maze Runner is the maze itself, whose
100-foot concrete walls were rigged to move, at some unknown point in
the past when it was created. The walls have decayed over the years, and
parts of it break off as the walls shift. The walls are also covered
with ivy, which presented Method with some particular challenges for
creating complex geometries that are also deeply organic. For both the
creatures and the atmospheric elements, Method developed its own
software to facilitate their experience as artists, an emphasis that
shines through in work that we, frankly, think looks quite impressive.
At the heart of The Maze Runner is the maze itself, whose
100-foot concrete walls were rigged to move, at some unknown point in
the past when it was created. The walls have decayed over the years, and
parts of it break off as the walls shift. The walls are also covered
with ivy, which presented Method with some particular challenges for
creating complex geometries that are also deeply organic. For both the
creatures and the atmospheric elements, Method developed its own
software to facilitate their experience as artists, an emphasis that
shines through in work that we, frankly, think looks quite impressive.
 The
walls are also covered with ivy, which presented Method with some
particular challenges for creating complex geometries that are also
deeply organic.
As we spoke with Sue and Animation Director Erik de Boer, we found them
both to be terrific storytellers themselves. We were happy to get out of
the way, and let them fill in the details.
The
walls are also covered with ivy, which presented Method with some
particular challenges for creating complex geometries that are also
deeply organic.
As we spoke with Sue and Animation Director Erik de Boer, we found them
both to be terrific storytellers themselves. We were happy to get out of
the way, and let them fill in the details.
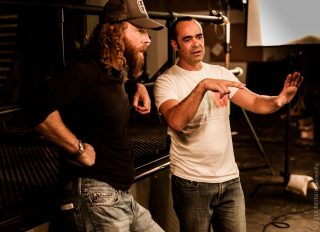
 Left, Animation Director Erik de Boer; Right, Method Studios' VFX Supervisor Sue Rowe.
My daughter read
The Maze Runner, and she loved it. I heard
that there was a film being made by Fox, so a couple colleagues here at
Method just hopped on a plane down to see Fox Vice President of Visual
Effects Joe Conmy to say, "We really want to work on
The Maze Runner."
Shortly after that, I met up with Wes Ball, the director. He's such an
unassuming guy, but he's full of energy and incredibly articulate. The
way he describes things, you just get completely engaged. Within five
minutes of meeting him, he was describing the opening shot of the movie,
and he's bouncing around the room, acting it out, giving me sound
effects and everything. I was like, "Ah! I'm in. I so want this show."
So I didn't let it go until they gave it to us.
 Wes Ball (right) directs Dylan O'Brien (left) on set.
Because Wes comes from an animation background, he was able to give us
great notes. We would record the sessions with him because the noises he
made and his head movements were very much in line with what he wanted
the Griever character to do.
So he was pulled on board for the character, but also the environments,
because he could actually do his own previs. Wes likes to work using a
software called Modo, and so he would mock up preview scenes with
cameras. I looked at his previews, and I thought, "Okay, so I need a
camera 100 feet high, that means I need a Technocrane in an environment
with a 50-foot reach."
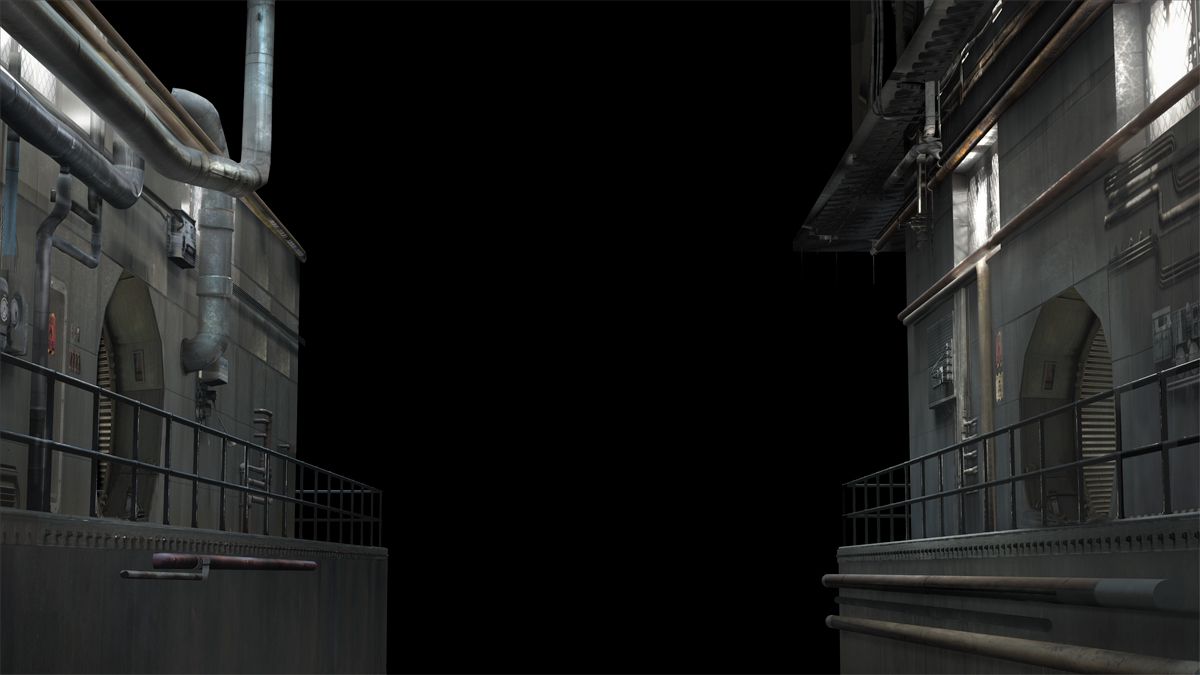
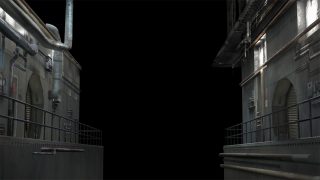
 |
 |
| Final comp and before shots. Click to enlarge. |
We only had two days from the shoot to get the footage we needed, but
because we planned really well, we got every angle that we needed.
That's something that I'm asked to do more and more on feature films
because the shoot times are so short.
We talked to Wes every day, which is the way to do it, because he's
based in LA, down there with editorial, and we are in Vancouver. He
would do his mock-ups in Modo, and then we'd talk about them the next
day in the cineSync remote collaboration and review system. We also set
up a Skype camera so that we could see the way he acted out the scenes.
THE MAZE AS A CHARACTER
As the VFX Supervisor, I was on location in the glade, which is sort of
the safe area right in the center of the maze. We built a wall that was
about 16 feet high and about 40 feet wide – just a simple facade, but we
got a lot of shots for free in front of that, and lots of dialog shots.
 The Maze had 100-foot concrete walls that were rigged to move to add a challenge to the game.
That was a pretty tricky shot in itself because the trees in that big
field were already 100 feet high. So we had to take out those 100 feet
high trees, and replace them with a 120-foot wall.
The first time that the character Thomas is in the maze, we needed to
pull the camera back for a wide 360, so he's surrounded by the walls
that are covered with ivy as the camera is moving. We approached it in a
modular fashion. Especially with 3D, you have to be economical in how
you build things. Render engines fall over and die if there's too much
geometry.
 The
first time that the character Thomas is in the maze, Method needed to
pull the camera back for a wide 360, so he's surrounded by the walls
that are covered with ivy as the camera is moving
The
first time that the character Thomas is in the maze, Method needed to
pull the camera back for a wide 360, so he's surrounded by the walls
that are covered with ivy as the camera is moving
We took a lot of really of great reference photos from the set pieces,
then we used a LiDAR scaner to do 3D laser imaging to help us glean as
much as we could from the actual location and the actual set build. And
then we went about building those. We wound up with 15 flat surface
walls, and then five kind of different corners, and then some different
style cracks, and so on.
But the biggest thing was the ivy on the walls, which I knew was going
to be a technical challenge: thousands of tiny leaves, and building them
in an organic way. I got a couple of guys on my team, effects technical
director Harsh Mistry and visual effects artist Kuba Roth, to look into
some software to build ivy and grow vines. In the end we ended up
writing our own proprietary software. I know everyone says that but we
really
did!
I loved it because it was a really creative tool. We didn't have too
many varieties of walls, but then each time the ivy was grown on it, it
would clearly be different than on the other walls, so it was always
going to look like a unique wall. We even wrote in tools so that I could
vary the thickness of the base of the ivy, and how many branches it
would split into.
One of the cool touches that they gave me was that we could rotate the
ivy leaves to always face the sun as it moved across the scene. It
allowed us to catch a nice bit of light and add some randomness to the
shot.
 Method could rotate the ivy leaves to always face the sun as it moved across the scene.
GETTING THE BUGS IN
Method could rotate the ivy leaves to always face the sun as it moved across the scene.
GETTING THE BUGS IN
The thing that you need to think about for the computer-generated
objects that you're creating is how would they really look if they were
filmed. It doesn't matter now that it's digital film. It still has a
certain look, and it has to do with adding motion blur, adding film
grain, and matching the black and the white points on your CG to make
sure it fits into your live action plates.
Of course, we had to build the floor of this giant maze as well. The
floor had lots of greenery and tufts of grass, and all the little things
that you add when you get your head around building a totally CG
environment that feels real.
For example, when I was on the location in this field in Louisiana where they were shooting, there were bugs
everywhere,
snakes – the whole caboodle. It was a very uncomfortable place to
shoot. When I came back to the office, and we'd be looking at the live
action, there'd be all tiny bugs kind of flying around. And then when
you pan over onto a completely CG wall, they were missing, right?
So we made a whole library of CG bugs, which my producer still laughs at
me about because it wasn't in the original brief, but I knew it would
be subtle stuff like that that just would keep it all alive. When we
showed Wes, he loved it, but our joke was, at the end of every daily
session he would say, "That was great, that was great, add more bugs!"
GOLDEN HOUR
One of the challenges of building a CG maze whose giant walls keep
moving is that you need to be able to crash zoom into a close-up wall,
and then another shot is a wide establisher, so we built a number of
levels of detail for them. We call them LODs. We were then able to judge
that if a shot was mid-distance, we could use a lower level of detail,
and then the foreground would be high res. These are the kinds of
judgments that allowed us to keep our costs as low as possible, while
delivering shots that looked much more expensive.
 Teresa (Kaya Scoderlario), Thomas (Dylan
O'Brien), Alby (Aml Ameen) and Jeff (Jacob Latimore) react to a shocking
development in the Glade.
Teresa (Kaya Scoderlario), Thomas (Dylan
O'Brien), Alby (Aml Ameen) and Jeff (Jacob Latimore) react to a shocking
development in the Glade.
But I think the artistry on the walls was making them feel like they had
scale. The cool thing was that the story dictated that the maze doors
open at dawn and close at dusk. And both those times of day, regarding
lighting, are the most peaceful times. It's golden hour. So we were able
to employ kind of soft, raking lights, which, in a lot of cases broke
the huge scale of the wall. So wherever we could, you'll see shots where
we pull wide and there's a shaft of light going down the side of the
wall. It gave a shape to the scale, and caught the subtleties in the
texture on the wall.
That was a good thing to do because, quite often, poor CG lacks
detail and texture. I wanted to do my very best to show that off,
because all the detail was in fact in the CG. It turns out that golden
hour lighting is the best time to shoot, and it's the same for digital
worlds as well.
 Dylan O'Brien stars as Thomas in THE MAZE RUNNER.
WALLS AND FLOORS
Dylan O'Brien stars as Thomas in THE MAZE RUNNER.
WALLS AND FLOORS
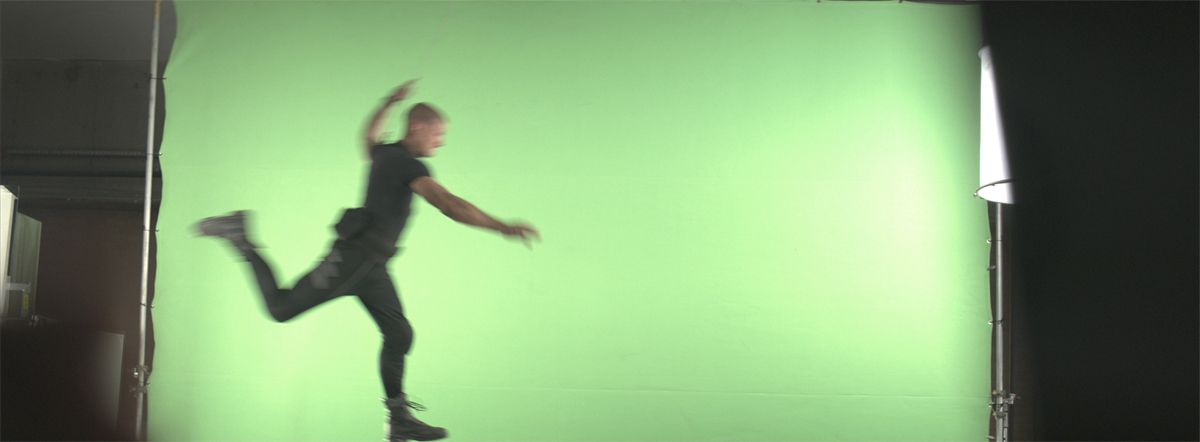
It was a 9-week shoot, but everything for the moving maze was shot in a
car park over two days, which is a ridiculously short amount of time. It
was an unkempt car park, so there was a dirt floor and some greenery.
And then, we had about 180 feet of blue screen, which was about 40 feet
high. It was held up by shipping containers, which I'd done for a
previous show back in the UK, on
John Carter, because the containers can stand up to all weathers, and they don't get blown about in the wind.
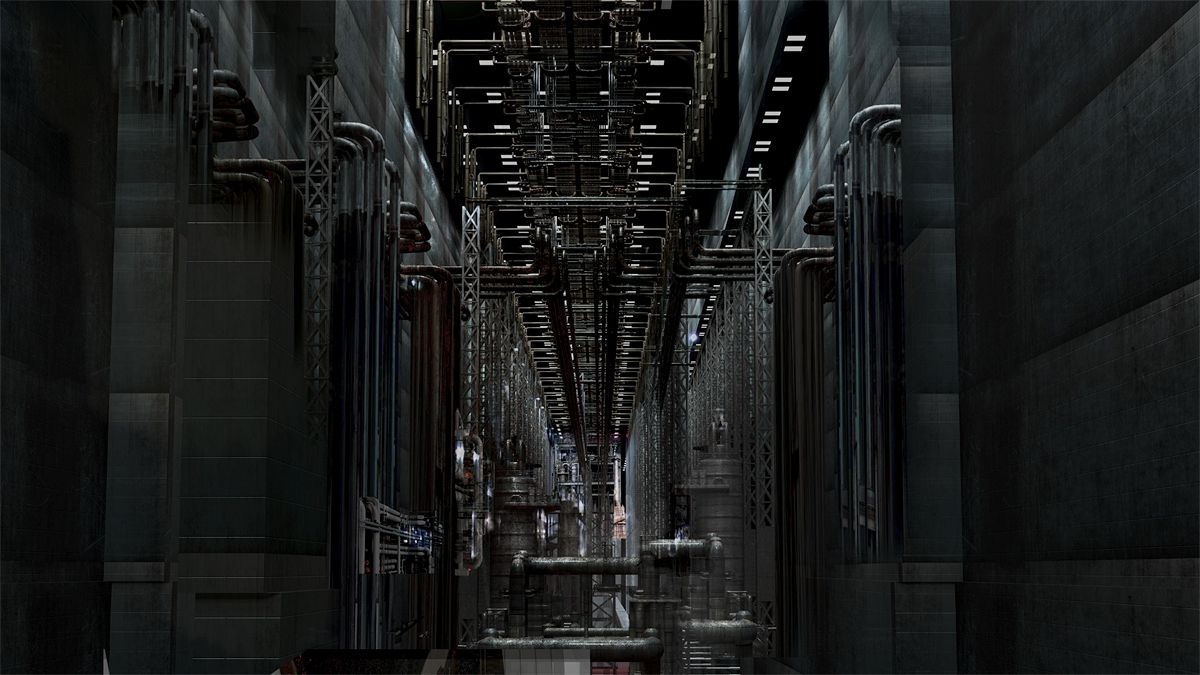
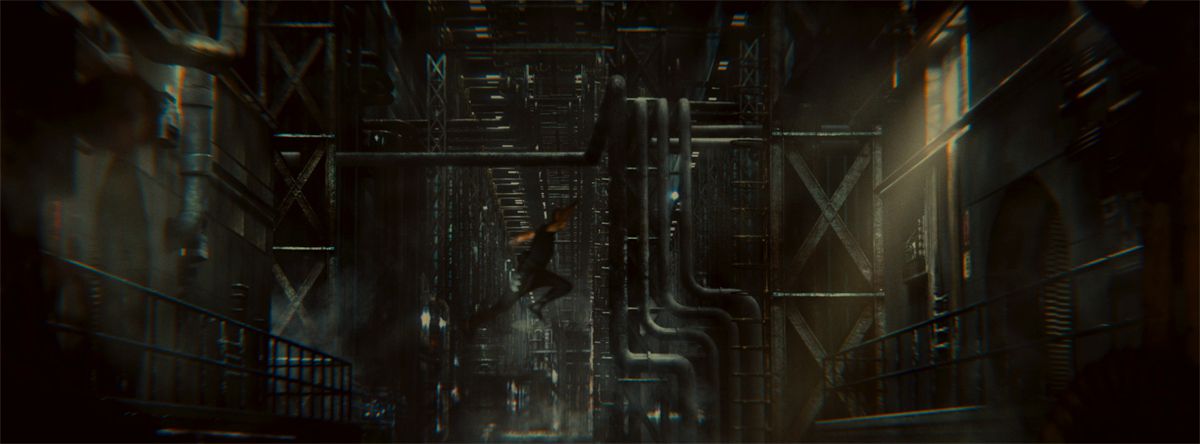
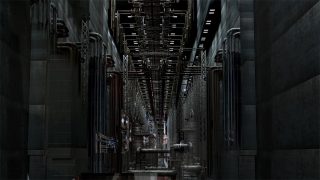
 The
very impressive final maze walls. There were actual tufts of grass in
the car park concrete where some of the filming took place – the actual
landscape had a deep effect on the final VFX shots.
The
very impressive final maze walls. There were actual tufts of grass in
the car park concrete where some of the filming took place – the actual
landscape had a deep effect on the final VFX shots.
The floor was really important, because with any CG, contact with the
ground is the hardest part to make look real. If I had a real floor on
location, I could put in the walls behind them, but that wasn't
possible. The idea is that this maze had been around for a number of
years, and when the kids are running, this floor that was rigged long
ago is suddenly called to action. The kids have basically set off an
alarm.
 Young
men, including Thomas (Dylan O'Brien, center, pointing) trapped at an
undisclosed locale, investigate the mysteries of a massive maze.
Young
men, including Thomas (Dylan O'Brien, center, pointing) trapped at an
undisclosed locale, investigate the mysteries of a massive maze.
We needed to crack the ground, and shoot up theses sort of geysers of
dust to show how the ground was crumbling under them. The soil itself
was very light, then this fine powder shooting up – a very fine
particulate that we rendered as Houdini particles. Then a layer of grit,
and then rubble, and then large chunks of ground. By combining multiple
layers, we built up the kind of complexity that you see in nature.
It was only about 15-20 shots, but we needed to sell this whole "tsunami of wall" flying behind the kids.
 Minho (Ki Hong Lee, left) and Thomas (Dylan O'Brien, right) search for a way out of the maze.
There were also repetitions in the modeling of the floor, but we were
able to hide it with lots of debris. If you saw the befores and afters,
it's really just a floor, blue screen, and tracking markers. We added
everything else. Including the bugs! There were markers for the
locations of these big, huge metal doors, but the set piece itself was
something like 6 feet by 12 feet, and needed to be completely replaced
in post.
We realized that in order to really give this some tension and some
fear, we needed to make sure that it wasn't just a couple of doors
opening and walls shifting. There are a couple of wide shots, but the
shots are mostly quite close, just overhead or just over their shoulders
while the kids are running. There was still enough room to frame with a
lot of grit and dust to it, to add extra tension and panic.
 |
 |
 |
| A group of boys known as the Gladers, are
shocked to discover a girl, Teresa (Kaya Scoderlario), amongst their
midsts. Click to enlarge |
A-MAZE-MENT
I had such a great time on this show! It was a great team of people.
Method had actually not been known for its character work, but that was
part of my plan when I joined Method, to bring together a creature team.
We got Eric de Boer from Rhythm & Hues, where he'd won an Oscar for
his work on
Life of Pi,and also James Jacobs, who was a sci-tech winner for his work at WETA.
[Ed.
note: James shared a Scientific & Technical Achievement Award from
the Academy "for the development of the Tissue Physically-Based
Character Simulation Framework."] James did the Goblin King for
The Hobbit: An Unexpected Journey,
so he was able create lots of muscle tissue and simulations for how the
skin would work on top of it – perfect for something like the Grievers.
 WETA whiz James Jacobs, an Academy Sci-Tech Award winner for technology used for The Goblin King (above) in The Hobbit: An Unexpected Journey, recently joined Method, and played key roles in the development and creation of the Grievers.
With a team like that, that's why we wanted to go for
The Maze Runner.
It was perfect for us. It featured some environment work, which Method
is already well-respected for, but creature work was really that thing
that I wanted to pull in too. I feel great that we got the job and I
think it was a success. Method has already got more creature work on the
back of it.
As a company, we're kind of punching above our weight, and that's where
we want to take it. Personally, I think creature work is my favorite
thing. My background is in traditional animation as well as computer
animation, so for me, as a VFX supervisor, this show was the culmination
of
so many good things.

The Grievers are the guardians of the maze.
GRIEVERS: GUARDIANS OF THE MAZE
Erik de Boer, Method Animation Supervisor for The Maze Runner
The Grievers are the guardians of the maze, to make sure that these kids
don't escape. They are slug-like creatures with organic bodies and six
huge mechanical legs. A bunch of them also have huge scorpion tails
coming out of the back of their organic bodies. There were about 150 of
these shots in all.
It was exciting to have something with a sort of a robotic, mechanical
feel to it, but that also needs to have the agility, and the appeal, of
course, to make it an exciting character. They need the agility to be a
threat to the kids, yet clunky enough to make it plausible for these
kids to outrun them, or outsmart them, long enough to escape the maze at
the end of the movie.
When we started to do motion tests for these guys, we looked at nature
for inspiration, as we always do. We looked at insects like cockroaches
and centipedes, and we definitely found a lot of interesting stuff
there. But when we did our initial test of the Grievers, they were just
too insectoid.
We then started to look at more mechanical machines. We found some
Burning Man hexapod creations, and we just tried to borrow some of that
motion language and awkwardness. Yet, at the end of the day, the
Grievers still had to be obviously competent protectors of this maze
that were actually designed to be inside of that environment. To
accomplish this, we gave them telescopic legs so that they could
partially retract them for the narrower alleys and sections in the maze.
This is less visual, but more of a back story: I liked the idea of their
organic hearts controlling the hydraulic fluids into the mechanical
legs. There were a lot of hoses that connected the organic heart to the
mechanical parts, and their lungs would be driving the pneumatic
actuators at the tip of their feet, as sort of jackhammers to find
perches and traction onto the maze walls and floors.
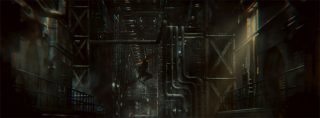
 |
 |
 |
 |
|
 |
| The Grievers were hideous and threatening,
but agile creatures that roamed the maze and attacked anyone they came
across. Final comp on the left and before shots on the right. Click any
image to enlarge. |
PIPELINE
It was important to me to find a way to get animators comfortable in
their sessions as quickly as possible. Get them to focus on the work and
take away a lot of the housekeeping that the pipeline had when we found
it. I think we were really successful in that.
That sounds trivial but to do that – but not in an environment where
everybody's fighting for CPU resources. When projects go away to a
render farm, they can sometimes get stuck there and never come back. We
managed to keep that smooth, but we also worked on allowing the
animators to have a more intuitive interaction with their rigs. Victor
Barbosa designed the griever rigs, and did a great job on it.
CG AND THE REAL WORLD
There's this spectacular end sequence called the Griever Finale, where
the kids run across this long bridge towards the exit of the maze, and
the Grievers are there to prevent them from doing so. They end up in a
close battle on this narrow bridge. Despite the fact that you would
expect these Grievers to be pretty competent, I think we've found the
believable way to make it a really exciting battle – back and forth a
little bit until of course the kids, no surprise, defeats them.
What I always like to do is find any excuse to connect the animation to
the physical world. In this case that could be a CGI environment, but
also the physical world: the walls, the ground, or any prop or live
action actor in the scene.
That can be done by moving a CGI character in and out of shadows that
are being cast from live action creatures, but also bodies bumping into
things, or tails that wrap around corners. And, of course, adding to
that later in the integration phase by having dust and rock bits flying
off.
Looking at what made previous CG characters successful or not is that
main collision, which is of gravity yanking this weight down, and the
paws hitting the ground. If that main collision is not there
convincingly, then you basically lose the whole battle.
What we did on the tiger for
Life of Pi was spend a lot more
R&D time on just the paws. We had to sell that every time that paw
collided with the ground, it was taking at least 80 or 100 pounds of
weight through it. We'd always done tendons tensing up, the scapula
firing up – but really getting the subtle shape changes into the paw,
that was really important.
 Pi Patel (Suraj Sharma) and a fierce Bengal
tiger named Richard Parker must rely on each other to survive an epic
journey. ™ and © 2012 Twentieth Century Fox Film Corporation. All rights
reserved.
Pi Patel (Suraj Sharma) and a fierce Bengal
tiger named Richard Parker must rely on each other to survive an epic
journey. ™ and © 2012 Twentieth Century Fox Film Corporation. All rights
reserved.
Now, for the grievers on
Maze Runner, we couldn't use the same tools that we had used for the tiger in
Life of Pi,
because the Grievers only have hard spikes that hit the ground. We used
the telescopic feature of them to try and sell as much as possible that
the weight was going into those legs.
Also, because they are six-legged, the weight distribution can be a
little bit sloppier because finding that triangle that supports the
weight. With six legs, there's always a bunch of them on the ground, so
you can be a little bit sloppier in terms of which leg the weight is
shifted over. Very often when you look at hexapods, the motion is a
little bit clunky in the middle and these six legs are doing their fun,
random, quick stuff. It was definitely a whole different challenge for
the Grievers than it was on, for instance, the tiger.
And I won't deny it: that was definitely an exciting part of this job.

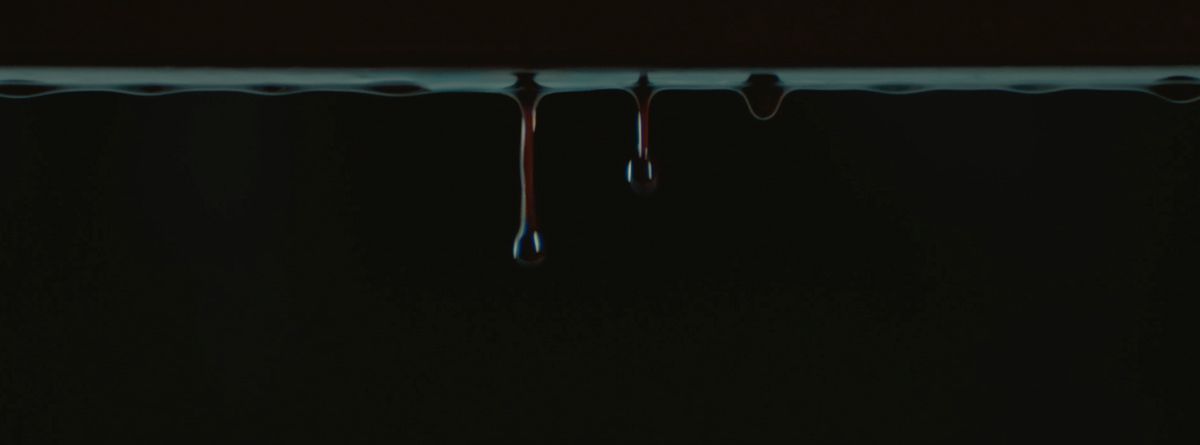
 That blood effect might typically be achieved by reversing high speed
film, but Anderson was aware the final result can appear problematic.
“I’m always adverse to doing reverse gags,” he says. “It is a little
obvious to our vision memory where you can pick up on little accents of
motion blur and acceleration/deceleration when it’s the wrong way
around.”
That blood effect might typically be achieved by reversing high speed
film, but Anderson was aware the final result can appear problematic.
“I’m always adverse to doing reverse gags,” he says. “It is a little
obvious to our vision memory where you can pick up on little accents of
motion blur and acceleration/deceleration when it’s the wrong way
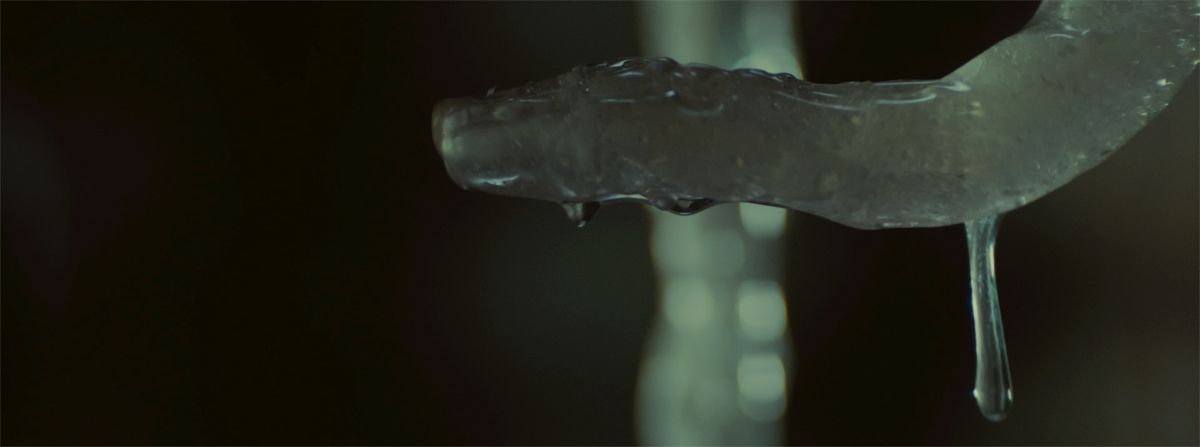
around.” With that blood effect so successfully achieved practically, Infini’s
special effects supervisor Phillip Young consulted Anderson on another
effect - the creepy ‘jelly fingers’ - that he was looking to solve. “We
used the same stepper motor drivers to add all the secondary and
tertiary motion to the worm-like forms,” outlines Anderson. “We had
little strings to lift the heads but all of that lovely sinusoidal
motion was entirely in camera and from the same phase gauge to give it
that slow jelly-like undulation.”
With that blood effect so successfully achieved practically, Infini’s
special effects supervisor Phillip Young consulted Anderson on another
effect - the creepy ‘jelly fingers’ - that he was looking to solve. “We
used the same stepper motor drivers to add all the secondary and
tertiary motion to the worm-like forms,” outlines Anderson. “We had
little strings to lift the heads but all of that lovely sinusoidal
motion was entirely in camera and from the same phase gauge to give it
that slow jelly-like undulation.” To solve the effect, the team elected to cover a stand-in actor,
Goran D. Kleut, with KY Jelly lubricant. “He has this most unique form
and is able to contort his body into the most extreme shapes and poses
that really fit the bill to create something that was a little bit
creepy and other worldly,” notes Anderson. “We shot his body for
traditional crowd replication but of course the poor bugger was covered
in KY jelly with a little bit of metal fleck added to it. He had to
stand up there for a couple of hours freezing his nuts off!”
To solve the effect, the team elected to cover a stand-in actor,
Goran D. Kleut, with KY Jelly lubricant. “He has this most unique form
and is able to contort his body into the most extreme shapes and poses
that really fit the bill to create something that was a little bit
creepy and other worldly,” notes Anderson. “We shot his body for
traditional crowd replication but of course the poor bugger was covered
in KY jelly with a little bit of metal fleck added to it. He had to
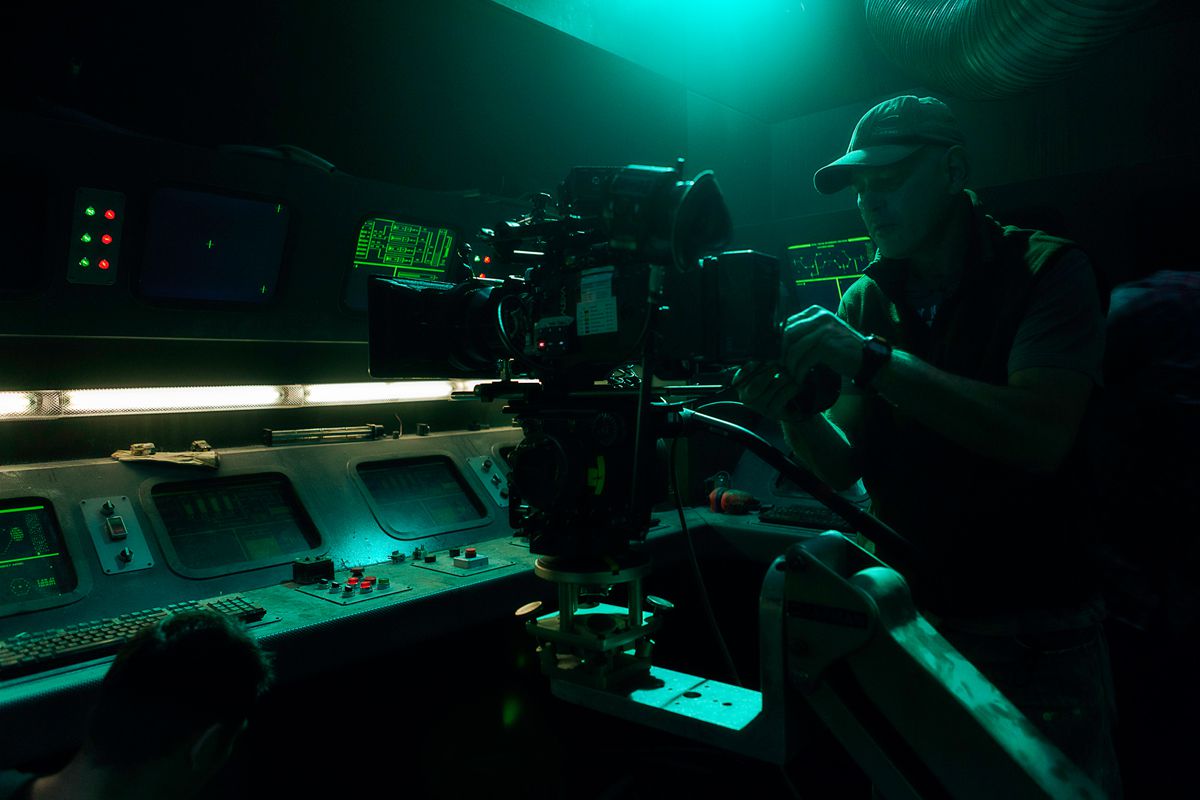
stand up there for a couple of hours freezing his nuts off!” The control room on the deep space mining station features views to
the extreme outdoors, as well as several monitors with information and
read-outs. These days it would not be uncommon for the graphics to be
burned in during post, but for these particular shots a unique approach
was undertaken. Production networked more than 20 Raspberry Pi computers
and monitors which were coded with interactive ASCII-like code -
programs that the actors could actually interact with by typing and
pressing buttons.
The control room on the deep space mining station features views to
the extreme outdoors, as well as several monitors with information and
read-outs. These days it would not be uncommon for the graphics to be
burned in during post, but for these particular shots a unique approach
was undertaken. Production networked more than 20 Raspberry Pi computers
and monitors which were coded with interactive ASCII-like code -
programs that the actors could actually interact with by typing and
pressing buttons. “It was an XML based bunch of ASCII that we could rig up that
illustrated the drilling process,” explains Anderson. “And an entire map
of the world. We were in geek heaven writing all of that! We put little
Easter eggs in there - story points and mythos for all of the universe.
Anyone who wants to go pausing and scanning those screens will be
rewarded.”
“It was an XML based bunch of ASCII that we could rig up that
illustrated the drilling process,” explains Anderson. “And an entire map
of the world. We were in geek heaven writing all of that! We put little
Easter eggs in there - story points and mythos for all of the universe.
Anyone who wants to go pausing and scanning those screens will be
rewarded.”
 The film also involved much more traditional visual effects - from CG
sets, matte paintings, environments to composites. One of the more
challenging shots involved Carmichael making a run for it from members
of his newly-infected team and leaping over a chasm, only to fall 30
meters.
The film also involved much more traditional visual effects - from CG
sets, matte paintings, environments to composites. One of the more
challenging shots involved Carmichael making a run for it from members
of his newly-infected team and leaping over a chasm, only to fall 30
meters.